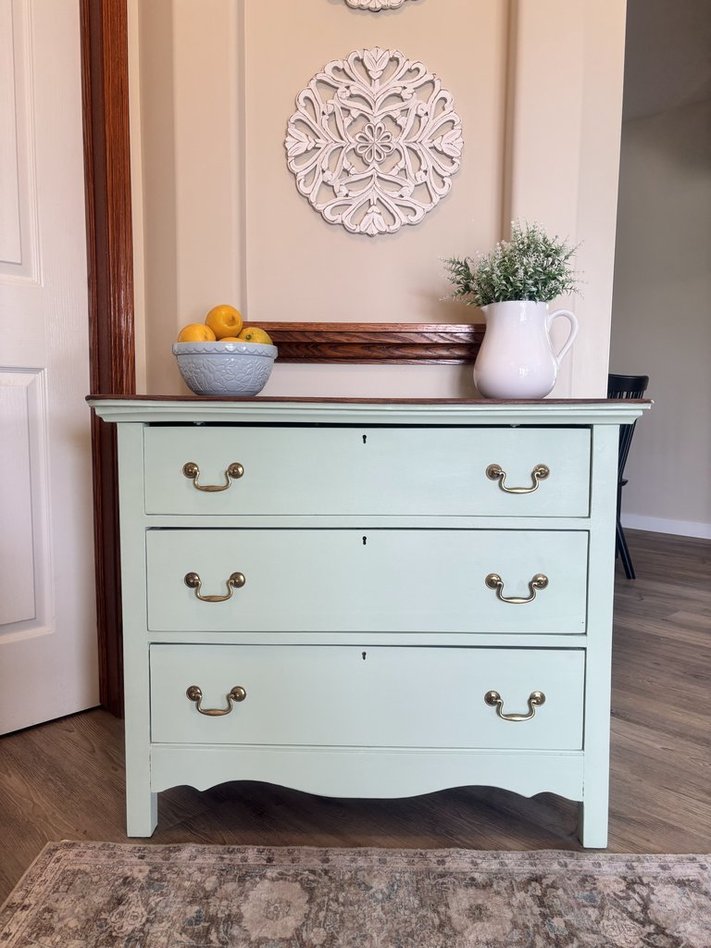
There is something special about antique furniture. Long before mass-produced furniture filled big-box stores, dressers were built to last for generations. The antique dresser featured here is a perfect example of that craftsmanship—a solid wood piece with classic lines, graceful curves, and decades of history hidden beneath its finish. In this post I will walk you through the process of refinishing an antique dresser with chalk paint. Read more to see how this dresser has been transformed into a piece that feels both timeless and current.

Whether you’re new to furniture refinishing or have completed several projects, restoring an antique dresser is one of the most rewarding ways to preserve history while creating a functional piece for today’s home.
Table of Contents
A Brief History of Antique Dressers
Three-drawer dressers like this one became incredibly popular from the late 1800s through the early 1900s. During this period, furniture makers focused on durability and practicality. Most homes relied on dressers for clothing storage long before built-in closets became common.

Many antique dressers were constructed from solid hardwoods such as oak, maple, walnut, or pine. Unlike much of today’s furniture, these pieces were built using traditional joinery techniques, including dovetail joints, mortise-and-tenon construction, and solid wood drawer boxes.
Because dressers were one of the most essential pieces of bedroom furniture, they were produced in large numbers. Families often passed them down from generation to generation, which explains why so many are still found in farmhouses, estate sales, antique shops, and family homes today.
Their abundance is also part of what makes them such great candidates for refinishing. While styles and finishes may become dated, the quality of the construction often remains exceptional. A dresser that is over 100 years old can frequently outlast many modern pieces sold today.
Why Antique Dressers Are Worth Refinishing
One of the biggest reasons antique dressers remain so popular is their quality. Older furniture was often made from real wood rather than particle board or engineered materials.

Refinishing allows you to:
- Preserve a piece of history.
- Reduce waste by keeping furniture out of landfills.
- Create a one-of-a-kind piece for your home.
- Customize colors and finishes to fit modern decor.
- Enjoy craftsmanship that is difficult to find in newer furniture.
Every refinishing project is essentially a blend of restoration and creativity. The goal isn’t to erase the dresser’s history—it’s to give it a new chapter.
Step-by-Step Guide to Refinishing an Antique Dresser
Step 1: Evaluate the Piece
Before reaching for sandpaper or paint, spend time inspecting the dresser.
Look for:
- Loose joints
- Wobbly legs
- Damaged drawer runners
- Missing veneer
- Cracks or splits in the wood
- Missing or damaged hardware
A careful inspection helps you identify repairs that need to be completed before refinishing begins.
Step 2: Clean Thoroughly
Years of furniture polish, dust, wax, and household grime can accumulate on antique furniture.

Use:
- A degreasing cleaner
- Warm water and mild soap (dish soap works well)
- Clean microfiber cloths
Cleaning first prevents contaminants from interfering with paint adhesion and stain absorption later.
Step 3: Make Repairs Before Sanding
Many antique pieces require some level of repair.
Common repairs include:
Gluing Loose Joints
Wood glue is one of the most important tools in furniture restoration. Drawer fronts, side panels, legs, and decorative trim often loosen over decades of use.
Remove old glue when possible and clamp repaired sections until fully cured.
Repairing Drawers
Older drawers may have:
- Loose dovetails
- Split bottoms
- Broken runners
Taking time to repair these issues dramatically improves usability.

Filling Small Imperfections
Minor dents, nail holes, and surface imperfections can be filled before painting. However, avoid overfilling or removing every sign of age. A few character marks help preserve the authenticity of the piece.
Step 4: Sanding the Wood Top Correctly
One of the biggest mistakes beginners make is treating every surface the same.
The wood top and painted body require different sanding approaches.
Sanding for Wood Stain

If you plan to stain a wood surface, proper sanding is critical.
A typical sanding progression might look like:
80 grit
- Removes old finish.
- Eliminates deep scratches and damage.
120 grit
- Smooths the surface after aggressive sanding.
150 grit
- Refines the wood further.
180 grit
- Creates a smooth surface ready for stain.
For many hardwoods, stopping at 180 grit produces excellent stain absorption. Sanding too finely can actually reduce how well stain penetrates the wood.
Always sand with the grain whenever possible.
Why Sanding Matters
Wood stain highlights every scratch. Skipping grits or rushing through sanding often leads to visible sanding marks once the stain is applied.
Good staining starts long before the stain can is opened.
Step 5: Scuff Sanding Painted Areas
Unlike stained wood, painted surfaces do not need to be stripped down to bare wood in most cases.

When using chalk paint, a simple scuff sanding is often sufficient.
Use:
- 180-220 grit sandpaper
- Sanding sponge
- Fine sanding pads
The goal is not to remove all existing finish.
Instead, you want to:
- Remove gloss
- Improve paint adhesion
- Smooth imperfections
- Create a consistent surface
This approach saves significant time while preserving the integrity of the furniture.
Step 6: Apply Chalk Paint
Many Chalk paints do not require a primer. However, I like to prime with every project because it gives me longer lasting results with my paint. It also helps with the overall look.

Chalk paint has become a favorite among furniture refinishers because of its versatility and forgiving nature.

Benefits include:
- Excellent adhesion
- Minimal prep requirements
- Beautiful matte finish
- Easy distressing options
Apply thin, even coats using a quality brush or roller.

Most projects require:
- Two coats for full coverage
- Light sanding (400 grit) between coats if necessary
Patience produces the smoothest finish.

Step 7: Stain the Wood Top
Once sanding is complete, remove all dust thoroughly.
Apply stain using:
- A lint-free cloth
- Foam applicator
- Staining pad

Allow the stain to penetrate according to the manufacturer’s instructions before wiping away excess.
Popular stain choices include:
- Special Walnut
- Provincial
- Early American
- Dark Walnut

A rich stained top paired with painted drawers creates a timeless contrast that works beautifully in farmhouse, cottage, transitional, and traditional interiors.
Step 8: Protect the Finish
Protection is just as important as paint and stain.
For painted surfaces, consider:
- Furniture wax
- Matte topcoat
- Water-based polyurethane
For stained wood tops:
- Polyurethane
- Furniture varnish
- Hard wax oil
A durable protective finish ensures the dresser can withstand years of everyday use.

In this project, I sprayed on Saman’s Interior Water Based Varnish in satin. Another one I really like is Varathane’s Premium Diamond Wood Finish in Satin.
Step 9: Restore or Replace Hardware
Hardware is often the jewelry of a furniture piece.
Many antique dressers feature original brass pulls that can be cleaned and reused.
Options include:
- Polishing original hardware
- Aging new hardware to match the piece
- Replacing missing pulls with period-appropriate reproductions

Retaining original hardware whenever possible helps preserve the character of the dresser.
Decorating With an Antique Dresser
One of the best things about antique dressers is their versatility.
In the Bedroom
The traditional location remains a classic choice.
Style it with:
- Framed artwork
- Lamps
- Mirrors
- Decorative trays
- Greenery
In an Entryway
An antique dresser creates both storage and visual impact.
Use drawers for:
- Gloves
- Hats
- Seasonal accessories
- Keys and mail

In a Dining Room
A dresser can function beautifully as a sideboard or buffet.
Store:
- Linens
- Serving dishes
- Holiday decor
In a Living Room
Use it as a statement piece beneath artwork or a television.
The warmth and character of antique furniture often soften modern spaces and create a collected, curated look.
In a Nursery
Many antique dressers make excellent changing stations and provide ample storage for clothing and baby essentials.
The Beauty of Imperfection
One of the most rewarding aspects of refinishing antique furniture is discovering the story hidden within each piece.

You may find old repairs, hand-cut joinery, pencil marks from a craftsman, or wear patterns that reveal decades of daily use. These details connect us to the people who owned and used the furniture long before it arrived in our homes.
Unlike modern factory-made furniture, no two antique dressers are exactly alike. Even pieces made by the same manufacturer can age differently depending on where they lived, how they were cared for, and the lives they were part of.
That uniqueness is what makes antique furniture so special.
Every antique dresser has its own quirks, character marks, repairs, and imperfections. Some drawers may slide differently. Some wood grain patterns may be more dramatic than others. Some pieces may show evidence of a century of family life.
Rather than flaws, these characteristics are reminders of the dresser’s journey.
When you refinish an antique piece, you’re not creating something new—you are preserving something old while giving it a renewed purpose. The result is furniture that tells a story, adds character to your home, and can continue serving future generations.
More Great Reads About Furniture Refinishing and DIY


Thank you so much for taking the time to read this post. I hope it inspires you to give furniture refinishing a try! Comment down below to let me know what your latest project has been and share this post with a furniture loving friend!
Leave a Reply