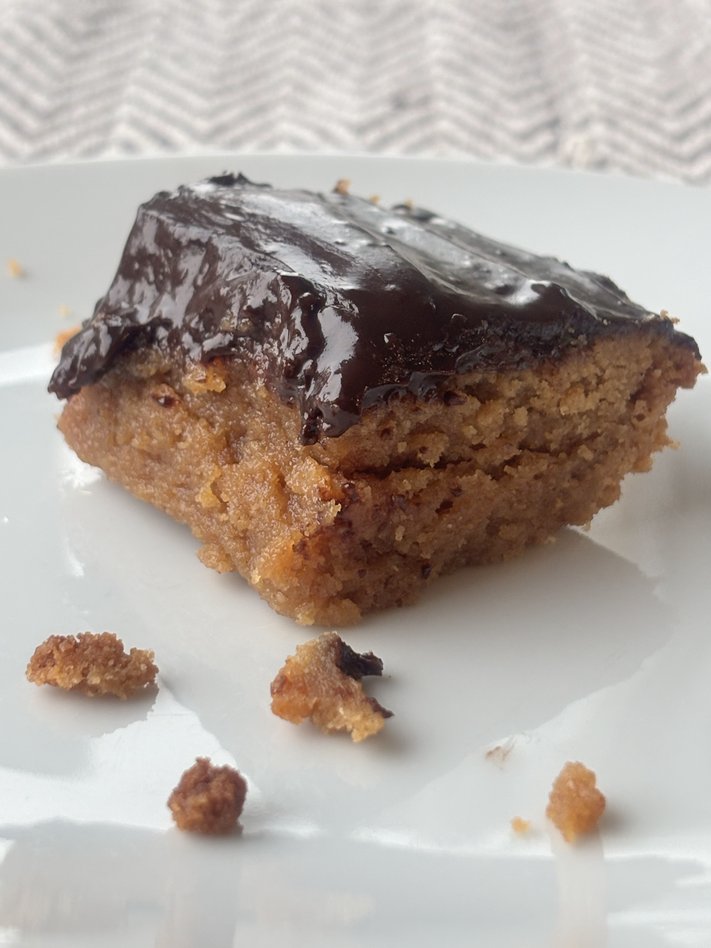
Easy, kid‑friendly, and wonderfully nostalgic, these gluten‑free peanut butter squares are the kind of treat that make your whole kitchen smell warm and cozy. This version is baked—soft in the center, lightly crisp around the edges—and topped with a silky chocolate frosting that sets beautifully in the fridge. It’s simple, pantry‑friendly, and exactly the kind of recipe I love sharing on Little Seeds Homemaking: unfussy, reliable, and perfect for feeding hungry kids (and parents!) on busy days.

There’s something so comforting about a recipe that uses ingredients you almost always have on hand. These peanut butter squares mix together in minutes, bake into a soft, chewy bar, and get finished with a glossy chocolate topping that makes them feel extra special. They slice cleanly once chilled, pack well in lunchboxes, and disappear quickly from the fridge.
Table of Contents
What Makes This Recipe a Keeper
- Naturally gluten‑free — no special flours or blends needed.
- One‑bowl batter — everything mixes together easily.
- Kid‑friendly texture — soft, chewy, and not crumbly.
- Chocolate topping — simple, smooth, and sets perfectly.
- Great for make‑ahead — they store beautifully in the fridge.

Ingredients You’ll Need
For the squares:
- 3 cups creamy peanut butter
- 2 cups sugar
- 3 large eggs
- 2 teaspoons vanilla extract
- 1 teaspoon salt
For the chocolate frosting:
- ½ cup heavy cream
- 170 g chocolate chips
- 1 tablespoon butter
Easy Kid‑Friendly Gluten‑Free Peanut Butter Squares Recipe


Easy Kid‑Friendly Gluten‑Free Peanut Butter Squares
Ingredients
Equipment
Method
- Preheat your oven to 350°F. Line an 8×8 baking pan with aluminum foil, making sure the edges hang over slightly so you can lift the bars out later.
- In a large bowl, cream together the peanut butter and sugar until smooth. Add the eggs, vanilla, and salt. Mix until everything is fully combined and the batter looks thick and glossy.

- Spread the batter evenly into your prepared pan. Bake for 50 minutes, or until the top looks set and lightly golden. Allow the bar to cool to room temperature.

- While the squares bake, heat the heavy cream in a small saucepan until steaming (not boiling). Remove from heat and stir in the chocolate chips and butter. Keep stirring until the mixture becomes smooth and shiny.

- Once the squares are room temperature, pour the warm chocolate frosting over the top and spread it evenly. Place the pan in the fridge to cool completely before slicing.

- Once chilled for about an hour, you can remove the bars and begin slicing them.
Notes
Tips for Perfect Peanut Butter Squares
- Use creamy peanut butter for the smoothest texture.
- Don’t skip the foil — it makes lifting and slicing so much easier.
- Let them chill fully before cutting; the frosting sets beautifully when cold.
- Warm your knife under hot water for cleaner slices.
- If you prefer a thicker frosting, double the chocolate topping.

Fun Variations to Try
Crunchy peanut butter for extra texture.
Swirl in jam before baking for a PB&J twist.
Add chopped peanuts on top of the frosting.
Use dark chocolate chips for a richer topping.
Try sunflower seed butter for a nut‑free version.

How to Store Them
- Fridge: Keep in an airtight container for up to 1 week.
- Freezer: Freeze sliced squares for up to 3 months. Place parchment between layers to prevent sticking.
They thaw quickly, making them perfect for lunchboxes or last‑minute snacks.

Serving Ideas
- Cut into small squares for toddler‑friendly bites.
- Serve with fruit for an easy after‑school snack.
- Add to a dessert board with berries and pretzels.
- Warm slightly and serve with a scoop of vanilla ice cream.

FAQ
Are these squares gluten‑free? Yes! All the ingredients are naturally gluten‑free. Just double‑check your chocolate chips and peanut butter to be sure.
Can I use natural peanut butter? You can! This is what I use. But stir it very well so the oil is fully incorporated. The texture may be slightly softer in the middle.
Do I have to use heavy cream for the frosting? Heavy cream gives the smoothest, most stable frosting. In a pinch, you can use canned coconut milk but I don’t like the texture as much.
Can I reduce the sugar? A small reduction is fine, but too much will change the texture. These bars rely on sugar for structure.
Can I bake this in a larger pan? Yes, you can bake these in a 9×13 but the bars will be thinner and may bake faster. Start checking around 35 minutes.
Do these freeze well? You can freeze them but sometimes the frosting will get a faded look to it. I would recommend freezing the cookie bottom and then quickly making the frosting on the day you want to use them.

A good recipe always feels a little more special when it becomes part of your family rhythm, and these peanut butter squares fit so easily into that space. They’re the kind of easy homemade recipe you can pull together on a weekday afternoon without overthinking it, yet they still taste like something you’d proudly share with friends or bring to a gathering. The simple ingredients, the warm peanut‑butter‑and‑vanilla aroma, and that glossy layer of chocolate all come together to make a treat that feels both nostalgic and practical.
What I love most is how approachable this is as a kid‑friendly recipe. The batter mixes in one bowl, the frosting melts together in minutes, and the finished squares slice cleanly once chilled—perfect for little hands, lunchboxes, or after‑school snack plates. Whether your kids like helping in the kitchen or just enjoy being the official taste‑testers, this is one of those recipes that invites them in without any fuss.
And of course, the fact that this is a gluten‑free recipe makes it even more versatile. There’s no need for special flours or complicated substitutions—just everyday ingredients that naturally bake into soft, chewy squares with a rich chocolate topping. It’s a dessert that works for playdates, potlucks, or anyone who needs a simple gluten‑free option that still tastes indulgent.
As you make these peanut butter squares and tuck them into your fridge for the week ahead, I hope they bring a little ease and a little joy into your home. Recipes like this remind us that homemade doesn’t have to mean complicated—it can be simple, dependable, and delicious every single time.
More Easy Homemade Recipes


Leave a Reply